In this tutorial I will guide you how to build a simple controller-based web API that uses Java, Spring Boot, and Spring Data JPA. If you are new to web development, specially API development, just feel relax and spend few minutes to read about what is the API, and how it works. Otherwise, let’s jump into the interesting parts.
In this tutorial, you learn how to:
- Configure and create a API project using Java and Spring Boot
- Add a model class for data storage using Spring Data JPA
- Design and implement Repository and Service layers to separate persistent logic and business logic
- Implement a controller with CRUD methods to handle HTTP request/response
- Test the API with Curl
At the end, you have a web API that can manage note items stored in a database.
| API | Description | Request body | Response body |
|---|---|---|---|
GET /api/notes |
get all notes | none | array of notes |
GET /api/notes/{id} |
get a note by id | none | a note |
POST /api/notes |
add a new note | note item | a note |
PUT /api/notes/{id} |
update a note by id | note item | a note |
DELETE /api/notes/{id} |
delete a note by id | none | none |
The following diagram shows the design of the application.

Prerequisites
- Spring Boot v2.0+
- JDK 11 or later
- Maven 3+
- Podman or curl (for testing api endpoints)
- Java IDE (intelliJ, Eclipse, VSCode)
Add dependencies
From the root project, let’s open the pom.xml file and add the following dependencies into the <dependencies></dependencies> section.
<dependency>
  <groupId>org.springframework.boot</groupId>
  <artifactId>spring-boot-starter</artifactId>
</dependency>

<dependency>
  <groupId>org.springframework.boot</groupId>
  <artifactId>spring-boot-starter-web</artifactId>
</dependency>

<dependency>
  <groupId>org.springframework.boot</groupId>
  <artifactId>spring-boot-devtools</artifactId>
</dependency>

<dependency>
  <groupId>org.springframework.boot</groupId>
  <artifactId>spring-boot-starter-data-jpa</artifactId>
</dependency>

<dependency>
  <groupId>org.projectlombok</groupId>
  <artifactId>lombok</artifactId>
  <version>1.18.22</version>
  <scope>provided</scope>
</dependency>
Add a model class
OK, let’s get started by adding the model class, from the project you let’s create a model folder, and inside it, create a Java pojo class Note.java.
Model theoretically is a set of classes that represent the data that the application manages for persistent logic and represent for the view (UI).
The model for our application is just a single Note class.
src/main/java/com/harrykien/notes/model/Note.java
import java.util.Date;

import org.hibernate.annotations.CreationTimestamp;
import org.hibernate.annotations.UpdateTimestamp;

import jakarta.persistence.Basic;
import jakarta.persistence.Column;
import jakarta.persistence.Entity;
import jakarta.persistence.GeneratedValue;
import jakarta.persistence.GenerationType;
import jakarta.persistence.Id;
import jakarta.persistence.PreUpdate;
import jakarta.persistence.Table;
import jakarta.persistence.Temporal;
import jakarta.persistence.TemporalType;
import jakarta.persistence.UniqueConstraint;
import lombok.Data;

@Entity
public class Note {
    @Id
    @GeneratedValue
    private Long id;

    @Column(name = "title")
    private String title;

    @Column(name = "body")
    private String body;

    @CreationTimestamp
    @Column(name = "created_at")
    @Temporal(TemporalType.TIMESTAMP)
    private Date createdAt = new Date(); // initialize created date

    @UpdateTimestamp
    @Column(name = "updated_at")
    @Temporal(TemporalType.TIMESTAMP)
    private Date updatedAt = new Date(); // initialize updated date

    public Note() {
    }

    public Note(String title, String body) {
        this.title = title;
        this.body = body;
    }

   @PreUpdate
   public void setUpdatedAt() {   // for automatic update timestamp
       this.updatedAt= new Date();
   }
}
Here we have some JPA annotations explanation:
- @Entity - to make this object to be persisted and managed storage in a JPA-based data storage.
- @Id - to make this field to be a unique identifier of the entity.
- @GeneratedValue - to provides for the specification of generation strategies for the values of primary keys.
- @Column - emphasize this field is the column in the database.
- @CreationTimetamp and @UpdateTimestamp - marks a property as the creation/update timestamp of the containing entity. The property value will be set to the current VM date exactly once when saving the owning entity for the first time.
- @Temporal - specify for persistent fields or properties of type java.util.Date
Add a repository
After a model is created, we need to add a repository respectively to handle the works like data accessing, querying with that model.
A repository theoretically is an abstract layer that provides access to data sources like networks or local databases processing. It can help to separate the data access logic from the business logic of an application. Spring Data JPA repositories are interfaces with methods supporting creating, reading, updating, and deleting records against a back end data store
Ok, short explanation is enough, let’s create a repository folder, and inside it create an interface NoteRepository.java.
/src/main/java/com/harrykien/notes/repository/NoteRepository.java
import com.harrykien.notes.model.Note;

import org.springframework.data.jpa.repository.JpaRepository;
import org.springframework.stereotype.Repository;

@Repository
public interface NoteRepository extends JpaRepository<Note, Long> {
}
By extending the JpaRepository interface which has two types, one is the domain type Note and the other one is id type Long provided by Spring Data JPA, we now automatically will be able to:
- Create new notes
- Update existing notes
- Delete notes
- find notes (one or many)
- and many more functionalities…
Add payloads
Have you ever noticed that, when we perform HTTP GET request properly, some data will be returned? And for some requests such HTTP POST or UPDATE, we mostly need to provide a request body with some data to be able to send the request huh? Yes it’s the payload.
We need a payload for request and response because it is the essential message or information required by the server to generate a response or the user to make a decision.
The payload of an API is the data provided for transporting to the server when you make an API request. It is the body of your HTTP request and response message. It may be a JSON, XML, HTML, TEXT, etc
Oki, let’s create a folder payload in the same location as model and service folders, and continually create two files NoteRequest.java for the requesting payload and NoteResponse.java for the responding payload.
/src/main/java/com/harrykien/notes/payload/NoteRequest.java
import lombok.Data;

import jakarta.validation.constraints.NotBlank;
import jakarta.validation.constraints.NotNull;
import jakarta.validation.constraints.Size;

@Data
public class NoteRequest {
      @NotBlank
      @NotNull
      @Size(min = 5, max = 200)
      private String title;

      @NotBlank
      @Size(min = 5, max = 500)
      private String body;
}
/src/main/java/com/harrykien/notes/payload/NoteResponse.java
@Data
public class NoteResponse {
      private String title;
      private String body;
}
Add a service
So far, we have added a model for handling data presentation, a repository for handling the persistence management, and now we need a service for handling application’s business logic. Ok, let’s create a folder service and inside it create a interface NoteService.java.
/src/main/java/com/harrykien/notes/service/NoteService.java
import com.harrykien.notes.model.Note;
import com.harrykien.notes.payload.ApiResponse;
import com.harrykien.notes.payload.NoteRequest;
import com.harrykien.notes.payload.NoteResponse;

public interface NoteService {
     List<Note> getNotes();

     Note updateNote(Long id, NoteRequest request);

     String deleteNote(Long id);

     NoteResponse addNote(NoteRequest request);

     Note getNote(Long id);
}
Not over yet, we need a concrete class which will carry out the implementation of this NoteService interface, inside the service folder, create a nested folder impl, and inside impl folder, create a java class NoteServiceImpl.java.
/src/main/java/com/harrykien/notes/service/impl/NoteServiceImpl.java
import org.springframework.beans.factory.annotation.Autowired;
import org.springframework.stereotype.Service;

import com.harrykien.notes.exception.ResourceNotFoundException;
import com.harrykien.notes.model.Note;
import com.harrykien.notes.payload.ApiResponse;
import com.harrykien.notes.payload.NoteRequest;
import com.harrykien.notes.payload.NoteResponse;
import com.harrykien.notes.repository.NoteRepository;
import com.harrykien.notes.service.NoteService;

@Service
public class NoteServiceImpl implements NoteService {

	@Autowired
	private NoteRepository noteRepository;
}
-
@Service (from Spring docs)
Indicates that an annotated class is a “Service” as “an operation offered as an interface that stands alone in the model, with no encapsulated state.” This annotation serves as a specialization of @Component, allowing for implementation classes to be auto detected through class path scanning.
Ok, now we need to provide the implementation for the not implemented service methods above.
Add a getNotes implementation
@Override
public List<Note> getNotes() {
    List<Note> response = noteRepository.findAll();
    return response;
}
Add a updateNote implementation
@Override
public NoteResponse addNote(NoteRequest request) {
    Note note = new Note();
    note.setBody(request.getBody());
    note.setTitle(request.getTitle());

    Note newPost = noteRepository.save(note);

    NoteResponse response = new NoteResponse();
    response.setTitle(newPost.getTitle());
    response.setBody(newPost.getBody());
    return response;
}
Add a deleteNote implementation
@Override
public String deleteNote(Long id) {
    Note response = noteRepository.findById(id).orElse(null);
    if (response == null) {
      return null;
    }

    noteRepository.delete(response);
    return "note has been successfully deleted";
}
Add a addNote implementation
@Override
public Note updateNote(Long id, NoteRequest request) {
     Note response = noteRepository.findById(id).orElse(null);
     response.setTitle(request.getTitle());
     response.setBody(request.getBody());

     noteRepository.save(response);
     return response;
}
Add a getNote implementation
@Override
public Note getNote(Long id) {
     return noteRepository.findById(id).orElse(null);
}
OK, done!…. wait, wait, wait, are we completely done? Still remember the design of the app above? What else are we still missing? isn’t a controller? Yes it is 😊
Add a controller
In the same location of service and repository folders, let’s create a controller folder, and inside it, continually create a file NoteController.java.
A controller is a class that intercepts incoming HTTP requests like POST, GET, UPDATE, DELETE,.., it converts the payload to internal data structure, prepares the model, and passes it to the client (UI, view) as the respective response.
/src/main/java/com/harrykien/notes/controller/NoteController.java
import com.harrykien.notes.model.Note;
import com.harrykien.notes.payload.ApiResponse;
import com.harrykien.notes.payload.NoteRequest;
import com.harrykien.notes.payload.NoteResponse;
import com.harrykien.notes.service.NoteService;

import org.springframework.beans.factory.annotation.Autowired;
import org.springframework.http.HttpStatus;
import org.springframework.http.ResponseEntity;
import org.springframework.web.bind.annotation.DeleteMapping;
import org.springframework.web.bind.annotation.GetMapping;
import org.springframework.web.bind.annotation.PathVariable;
import org.springframework.web.bind.annotation.PostMapping;
import org.springframework.web.bind.annotation.PutMapping;
import org.springframework.web.bind.annotation.RequestBody;
import org.springframework.web.bind.annotation.RequestMapping;
import org.springframework.web.bind.annotation.RestController;

import jakarta.validation.Valid;

@RestController
@RequestMapping("/api/notes")
public class NoteController {

      @Autowired
      private NoteService noteService;
}
As you noticed that, in the NoteService interface and NoteServiceImpl class, we have total 5 methods and its implementation, that means in the controller, we also need to create 5 HTTP handlers for those methods respectively.
Add a getNotes HTTP handler
@GetMapping
public ResponseEntity<List<Note>> getNotes() {
     List<Note> response = noteService.getNotes();
     return new ResponseEntity< >(response, HttpStatus.OK);
}
Add getNote HTTP handler
@GetMapping("/{id}")
public ResponseEntity<Note> getNote(@PathVariable(name = "id") Long id) {
     Note response = noteService.getNote(id);
     return new ResponseEntity<>(response, HttpStatus.OK);
}
Add a updateNote HTTP handler
@PutMapping("/{id}")
public ResponseEntity<Note> updateNote(@PathVariable(name = "id") Long id, @Valid @RequestBody NoteRequest request) {
     Note response = noteService.updateNote(id, request);
     return new ResponseEntity<>(response, HttpStatus.OK);
}
Add a deleteNote HTTP handler
@DeleteMapping("/{id}")
public ResponseEntity<String> deleteNote(@PathVariable(name = "id") Long id) {
    String response = noteService.deleteNote(id);
    return new ResponseEntity<>(response, HttpStatus.OK);
}
Add a addNote HTTP handler
@PostMapping
public ResponseEntity<NoteResponse> addNote(@Valid @RequestBody NoteRequest request) {
    NoteResponse response = noteService.addNote(request);
    return new ResponseEntity<>(response, HttpStatus.CREATED);
}
Here is some common controller annotations explanation:
-
@RestController indicates that the data processed by each method will be returned directly as the response body instead of passing to the view like @Controller does.
-
@RequestMapping(“/api/notes”) indicates the route of this controller, so that whenever from outside we access the /api/notes all actions will be redirected to this controller to process.
-
@GetMapping indicates the route with a HTTP GET capability representing for this method, however as you noticed that there is a parameter id inside it, it means we need a id value to be able to perform this request to get a specific note item.
-
@PutMapping indicates the route with HTTP PUT capability representing for this method, it also need a parameter id to be able to get and update specific note item.
-
@DeleteMapping indicates the route with HTTP DELETE capability, it needs a parameter id to get and delete specific note item.
-
@PostMapping indicates the route with HTTP POST capability, it perform creating a new note item.
-
@PathVariable - indicates that a method parameter should be bound to a URI template variable
-
@Valid - marks a property, method parameter or method return type for validation cascading
-
@RequestBody - indicates a method parameter should be bound to the body of the web request.
-
@ResponseBody - signals that this advice is rendered straight into the response body.
Add a fake database
Ok, let’s create some fake data, so when the application is fired up, some in-memory notes data will be created. From the same folder location (model, repository, service, controller,…) located, create a folder runner and inside it create a class DatabaseInitialization.java.
/src/main/java/com/harrykien/notes/runner/DatabaseInitialization.java
import org.slf4j.Logger;
import org.slf4j.LoggerFactory;
import org.springframework.boot.CommandLineRunner;
import org.springframework.context.annotation.Bean;
import org.springframework.context.annotation.Configuration;

@Configuration
public class DatabaseInitialization  {
    private static final Logger LOGGER = LoggerFactory.getLogger(DatabaseInitialization.class);

  @Bean
    CommandLineRunner initFakeData(NoteRepository repository) {
        return args -> {
          LOGGER.info("Preloading " + repository.save(new Note("new note 1", "new note 1 description")));
          LOGGER.info("Preloading " + repository.save(new Note("new note 2", "new note 2 description")));
    };
  }
}
What happens when it gets loaded?
- Spring Boot will run all CommandLineRunner beans once the application context is loaded
- This runner will request a copy of the EmployeeRepository you just created
- Using it, it will create two entities and store them
A fragment of console output showing preloading of data
2023-02-22T04:50:28.618+09:00  INFO 36276 --- [  restartedMain] com.harrykien.notes.NotesApplication     : Started NotesApplication in 3.067 seconds (process running for 3.372)
2023-02-22T04:50:28.670+09:00  INFO 36276 --- [  restartedMain] c.h.notes.runner.DatabaseInitialization  : Preloading Note(id=1, title=new note 1, body=new note 1 description, createdAt=Tue Feb 21 19:50:28 UTC 2023, updatedAt=Tue Feb 21 19:50:28 UTC 2023)
2023-02-22T04:50:28.672+09:00  INFO 36276 --- [  restartedMain] c.h.notes.runner.DatabaseInitialization  : Preloading Note(id=2, title=new note 2, body=new note 2 description, createdAt=Tue Feb 21 19:50:28 UTC 2023, updatedAt=Tue Feb 21 19:50:28 UTC 2023)
OK, now we completely done with the coding part. If you’ve followed along with me, you might have a project structure folder same as mine 😊.
src
├───main
│   ├───java
│   │   └───com
│   │       └───harrykien
│   │           └───notes
│   │               ├───controller
│   │               ├───model
│   │               ├───payload
│   │               ├───repository
│   │               ├───service
│   │               |   └───impl
│   └───resources
└───test
    └───java
        └───com
            └───harrykien
                └───notes
Note that project structure isn’t important much for now, so you can customize it as you wished. However having a good project structure helps you get a clear view about the project and can categorize files into the respective folder.
Oki, let’s execute the following command from the root of the project (where the pom.xml file located) to run the application.
./mvnw clean spring-boot:run
If the application get executed successfully, most likely your screen result will be the same as mine.

Despite the successful execution, to make sure our app functioning properly, let’s test it.
Test the API
For testing the API (controller endpoints), you normally have few options, for those of you who prefer working with UI can download and use the tool such Postman, otherwise, just following along with me using Curl to test the API inside the command line terminal. if you don’t have Curl installed yet, you can get it here
First up, it’s considered as the best idea to set curl in verbose mode -v, as the commands provide helpful information such as the resolved IP address, the port we’re trying to connect to, and the headers.
E.g. curl -v http://host:port/path
Test addNote request
curl -v -X POST -H "Content-Type: application/json" -d '{"title": "new note", "body": "new note body"}' http://localhost:8090/api/notes
In this command, we use Curl to perform HTTP POST request
- -v as described above is the verbose mode
- -X POST indicate the command of the HTTP request we want Curl to perform, which is POST
- -d here indicate HTTP POST data which is our request body
'{"title":"new note","body":"new note body"}' - -H is indicate the content type of the request which is
application/json
Output:

Test getNotes request
curl -v http://localhost:8090/api/notes
This command perform get all available notes item from database, it’s simple right?
Output:

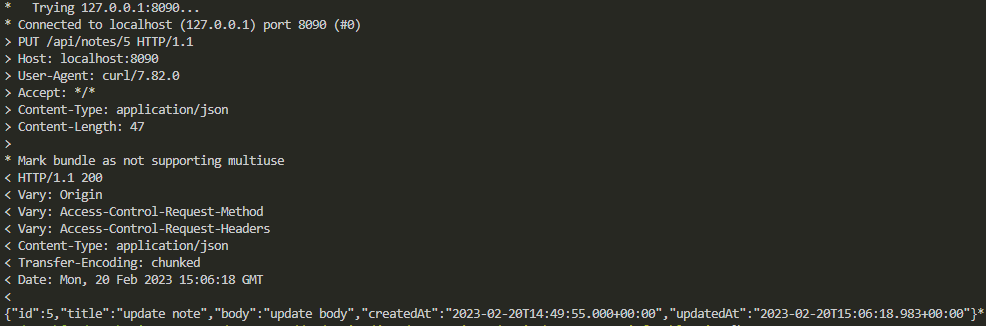
Test a updateNote by id request
curl -v -X PUT http://localhost:8090/api/notes/5 -d '{"title": "update note", "body": "update body"}' -H 'Content-Type: application/json'
This command perform HTTP PUT request, the structure is almost the same as the POST request.
Output:
Test getNote by id request
curl -v http://localhost:8090/api/notes/5
This command perform HTTP GET by id equal to 5
Output:

Test deleteNote by id request
curl -v -X DELETE http://localhost:8090/api/notes/5
This command perform HTTP DELETE request by id equal to 5
Output

Conclusion
In this tutorial, you learned how to build a web API service using Java and Spring Boot. Make multiple application layers such Model for data management, Repository for persistent logic, Service for business logic, and Controller for handling the HTTP request/response, finally we tested it via Curl. It was a long article but we finished it. I hope you enjoy this and found something helpful 😊.